
Original Wooden Frame Setup Guide
If you miss our Full Kit+Frame options, prefer painting before framing or simply like to do-it-yourself, you can indeed easily frame your painting on your own – it’s easy, quick, and very satisfying!
Step-by-Step Setup Guide
Discover your Craft-Ease™ Original Wooden Frame
Unfold your Craft-Ease™ Original Wooden Frame which includes:
- 4 wooden frame rods
- 30 by 50 cm frame and 40 by 50 cm frame come with 2 long frame rods and 2 shorter rods
- 40 by 40 cm comes with 4 equal-size rods
- a pouch of fixing nails

Step 1
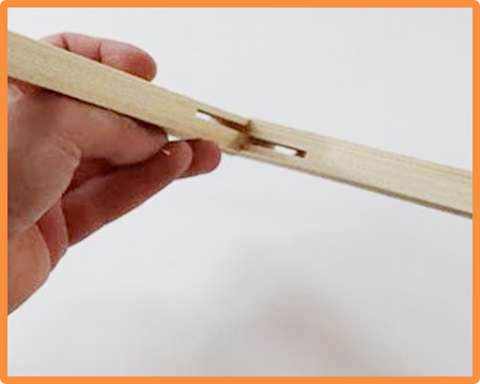
Start with a longer and a shorter frame rod. Press gently to connect the matching ends of the longer and the shorter pieces to form an angle. It’s fine if the pieces do not align perfectly at this point. Once the last rod is attached, the frame will be naturally straightened out.
Step 2
Continue with the remaining long rod by pressing the matching end of the shorter frame rod. Once this is ready, connect the final piece so that you form a rectangular wooden frame. The frame should be naturally straightened out once all pieces are securely attached.
Step 3
Lay your canvas facing down on a flat surface. Place your wooden frame on top of the canvas. The flat side of the frame should be in contact with the canvas and the beveled side should be facing up.
The rounded edges are important to increase the surface area of the wood, which lowers the friction the frame has with the canvas. By reducing the friction, it will allow you to more easily pull the canvas over the frame, and ultimately make it tighter. The rounded edges will also prevent the canvas from splitting or cracking.

Step 4
Make sure that your frame is straight and perpendicular to your canvas and that all borders are well aligned with the canvas.
Pull back the margin on one long side of the canvas, stretch and press it firmly onto the frame border. Use your thumb to press the fixing nail in the middle of the length – first push it only half way so that you can easily pull it out if there is any mistake in positioning the canvas to the frame. Flip the canvas over to make sure everything is aligned before you press fixing nail down completely.

Step 5
Fix the middle nails of all 4 sides first before fixing the remaining nails by spacing the nails out. Continue until the canvas is firmly fixed onto the original wooden frame.
Congratulations on framing your first Craft-Ease™ Paint by Number by yourself! Now it’s time to paint!